Crocheting involves only a limited number of stitches, but by combining them you can create many different patterns. We have devised a system of symbols for the stitches and these symbols are used in a pictorial diagram. From the diagram, you can see the degree of difficulty of each project, and you can tell at a glance how far along you are by checking your work against the diagram. While you may be unfamiliar with this approach to crocheting, we feel sure that, with a bit of practice, you will find it much quicker and easier than a row-by-row description method.
How to follow a crochet diagram. –
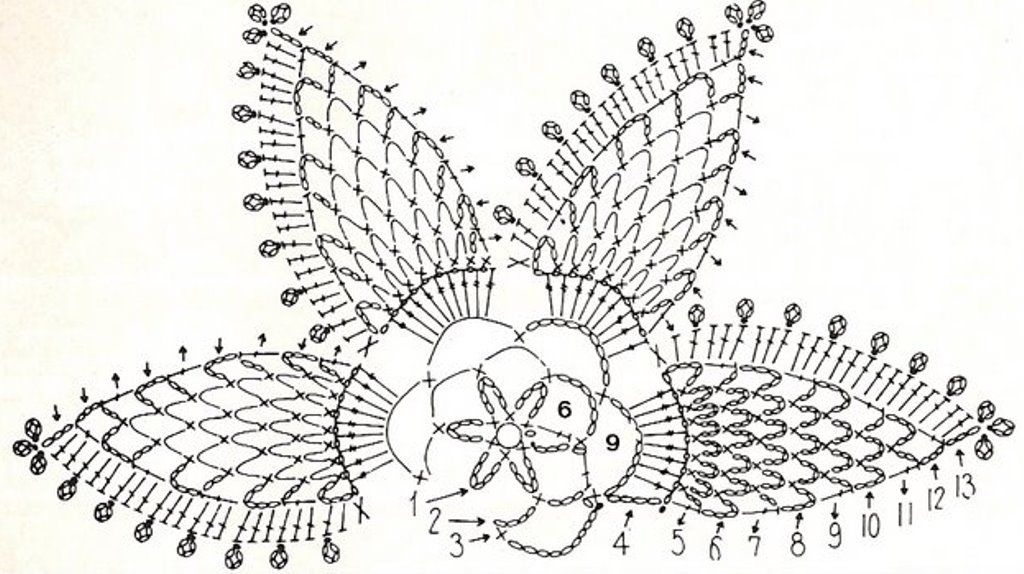
To get the project working smoothly, read the instruction and consult the abbreviations. Take, for example, the diagram shown here. Rows or rounds are numbered in lightface; a boldface number inside a loop tells you how many chains stitches to make in the loop. The abbreviation for chain stitch is ch, or ch st, and the symbol is O.

In this sample diagram, you can see that in Round 1 a loop has ch, while a loop in Round 3 has 9 ch. In Round 4, you are working in groups of 9 treble crochets, for which the abbreviation is tr and the symbol is![]() . Only part of Round 3 is given in detail. That is because the same series of stitches is repeated all the way around. Likewise, only one petal is shown in full detail, because the same pattern is repeated each time. Arrows indicate the direction of work. Note that some patterns will require special symbols, and these will appear alongside the diagram with an explanation.
. Only part of Round 3 is given in detail. That is because the same series of stitches is repeated all the way around. Likewise, only one petal is shown in full detail, because the same pattern is repeated each time. Arrows indicate the direction of work. Note that some patterns will require special symbols, and these will appear alongside the diagram with an explanation.
The additional diagrams -completed work, details of edging etc, will assist you in making more advance crochet projects.
A word of advice, always read the instructions carefully before you begin any project. They may contain information on a fancy stitch, or on edging or assembling that may not reflect in the diagram.
Read further on Crochet Abbreviations
https://www.avyastore.com/the-guide-crochet-abbreviations/


Be the first to comment